The Wall Center for Plastic Surgery
8600 Fern Avenue
Shreveport, LA 71105
Phone: (318) 795-0801
Monday–Friday: 8 a.m.–5 p.m.
The Wall Center for Plastic Surgery
8600 Fern Avenue
Shreveport, LA 71105
Phone: (318) 213-1772
Monday–Friday: 7 a.m.–5 p.m.
Tummy Tuck Aftercare Instructions
Proper Foam & Garment Placement Intro
It is so important to have your foam in the proper position to ensure that you get the maximum results from the surgery. In the days following surgery, your skin is very prone to wrinkling. Foam placement is essential to prevent wrinkles and skin creases.
2 Days Post-Op – Removing Your Garments & Foam Before Showering
- Remain hunched over at shoulders (not lower back to avoid lower back discomfort).
- When removing garments, do not remove white compression garment while standing. Once seated, detach drains from garment and place in lap ensuring they do not fall.
- Gently un-velcro white abdominal binder and remove the Kerlix gauze bandage (may be wet from drainage) and throw it away.
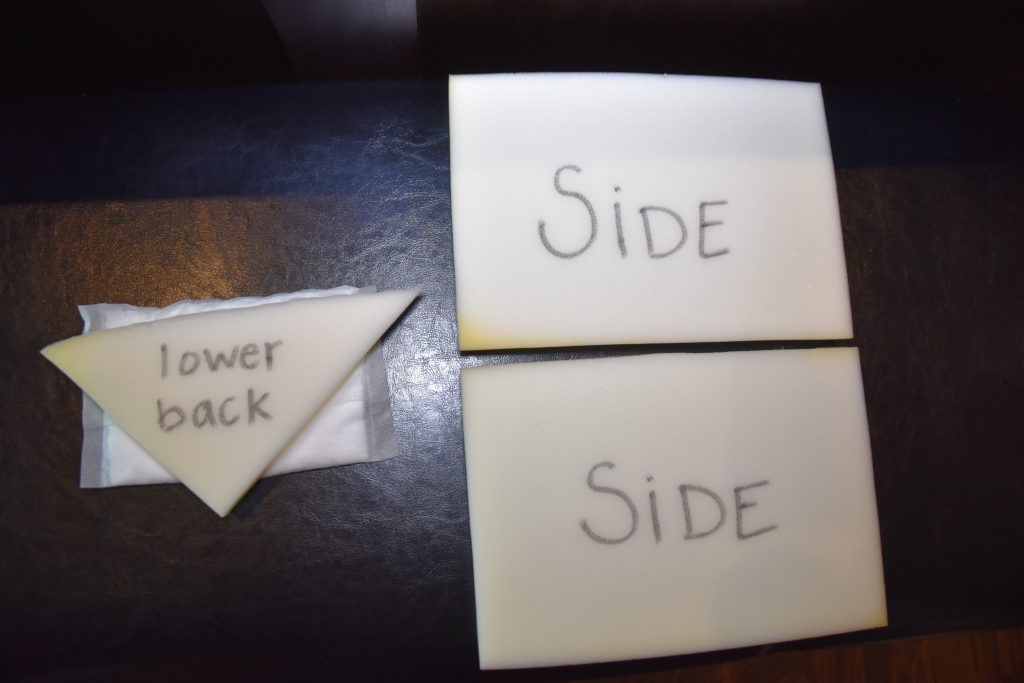
- Note foam placement (may take a photo) because foam will be replaced in the same area.
- Finish removing abdominal binder and remove foam pieces.
- While in the shower, clip drains to a lanyard or long necklace. (Your caretaker may also gently hold the drains. Do not pull at drain site.)
- Wash foam and abdominal binder. May wash both in washing machine & may dry white binder in dryer. DO NOT DRY FOAM in dryer. (Air dry or towel dry foam. Must be completely dry before getting your garment, foam, and binder back on.
After Shower White Garment Placement
- Once garment and foam have been cleaned and dried, and your skin (including surgery sites) are clean and dry, it is time to put the garment and foam back on.
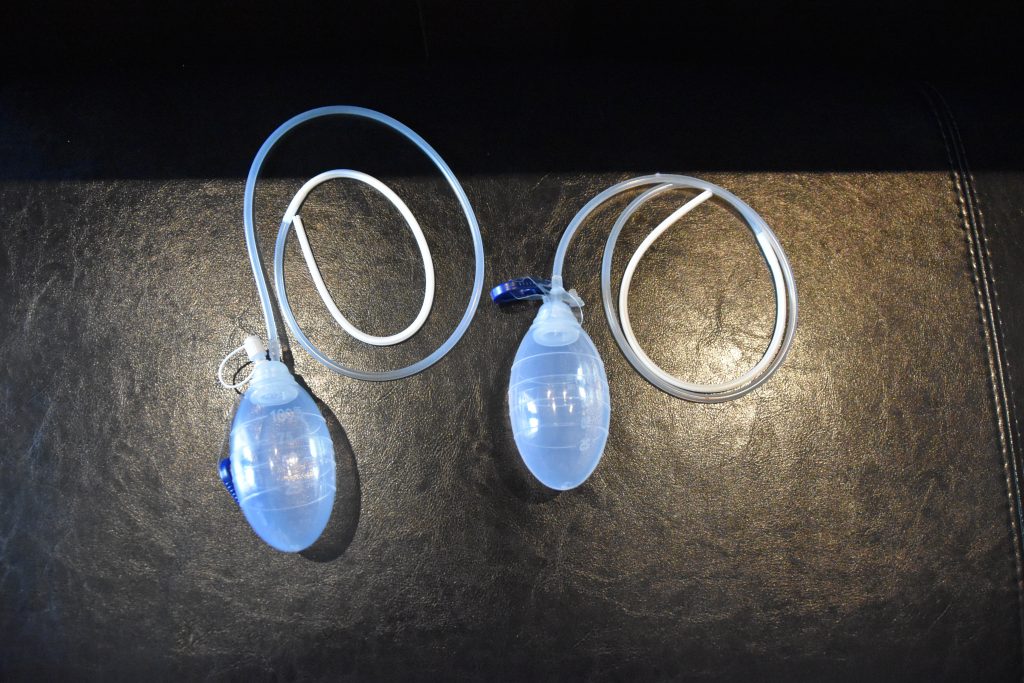
- Let’s make sure your bulb drains are collapsed and suctioning properly.
- You will see the bulb expand. Once it is about half-way full, empty it out and record your drainage output.
- Compress bulb again while placing the cap back on.
- You may have a pin rose drain at the base of your back that will also drain, but you do not need to keep up with it or mess with it in any way. It will be removed in the office.
- For the first week or so of post-op you are going to need help.
- Hold up the binder and notice the end that dips down in the middle, this is the bottom side. Wrap binder around you securely making sure drains are on the outside.
- Get one of the side foam pieces, flip the side of your binder up, and make sure the foam is over your tummy tuck incision and wrapped around your waist while standing tall with skin smooth under the foam.
- You do not want to lean to the side you are putting the foam on because it can make your skin bunch. It is okay to lean to the opposite side if needed to get skin tighter.
- If you had fat grafting to the buttocks, make sure the foam is low on your buttocks to hold the fat into place.
- Fold abdominal binder back down holding the foam in place.
- Repeat on the other side with the other piece of foam.
- The last piece of foam is a triangle to place in the lower-back region. The sticky back pad can be removed and replaced as needed due to drainage from pin rose.
- With binder folded up, place point of triangle right at the top of the butt crack. Then fold binder back down over the foam, holding it in place.
- Secure bulbs back to the front of binder.
Day 5 Black Garment Placement
- Seam should be on outside with smooth side against skin and tag the in front. It will look like it is inside out and backwards.
- Step into garment and pull up to thighs.
- Unclip drain bulbs and place them through the hole in the crotch.
- Pull garment up farther, pull one strap over shoulder, and clip it into place while holding the bulbs.
- Repeat with strap on the opposite side, then clip drains to the top of the black garment.
- With the sides of garment remaining open, grab one of the side pieces of foam and place it in the same position as previously instructed (skin smooth, over incision, and for fat grafting – low on back).
- Repeat on the other side.
- Place triangle piece as previously instructed at low back, point of triangle at butt crack.
- Now, start inching the garment up doing a couple eye hooks at a time to hold in place and then zip it up.
- Garment can be washed as needed. Let black garment air dry OR if you put it in the dryer DO NOT use heat (it will shrink and be difficult to get in).

We're Worth the Trip
Patients come from all across Ark-La-Tex and around the globe to receive world-class care at The Wall Center for Plastic Surgery and Jade MediSpa. We frequently see patients from many communities:
- Dallas, TX
- Texarkana, TX & AR
- Minden, LA
- Lafayette, LA
- Tyler, TX
- Little Rock, AR
- Monroe, LA
- New Orleans, LA
- Longview, TX
- Natchitoches, LA
- Nacogdoches, TX
- Jackson, MS
- Lake Charles, LA
- Marshall, TX
- Alexandria, LA
- Baton Rouge, LA
- Houston, TX
Take the first step today and request a consultation or call (318) 795-0801. Ask about our special programs for patients who travel, including our beautiful on-site guest suites. We can't wait to greet you!